
Tangled lanterns: A little DIY magic behind the floating lights
My wife loves Rapunzel, Pascal, and all things Tangled. Especially the lantern scene which, I have to agree, is one of the most romantic and visually engaging scenes orchestrated by Disney. To capture a little bit of this magic at home, I set out on an adventure to create our own Tangled lanterns modeled after the movie and those hanging at the Rapunzel bathrooms in the Magic Kingdom.
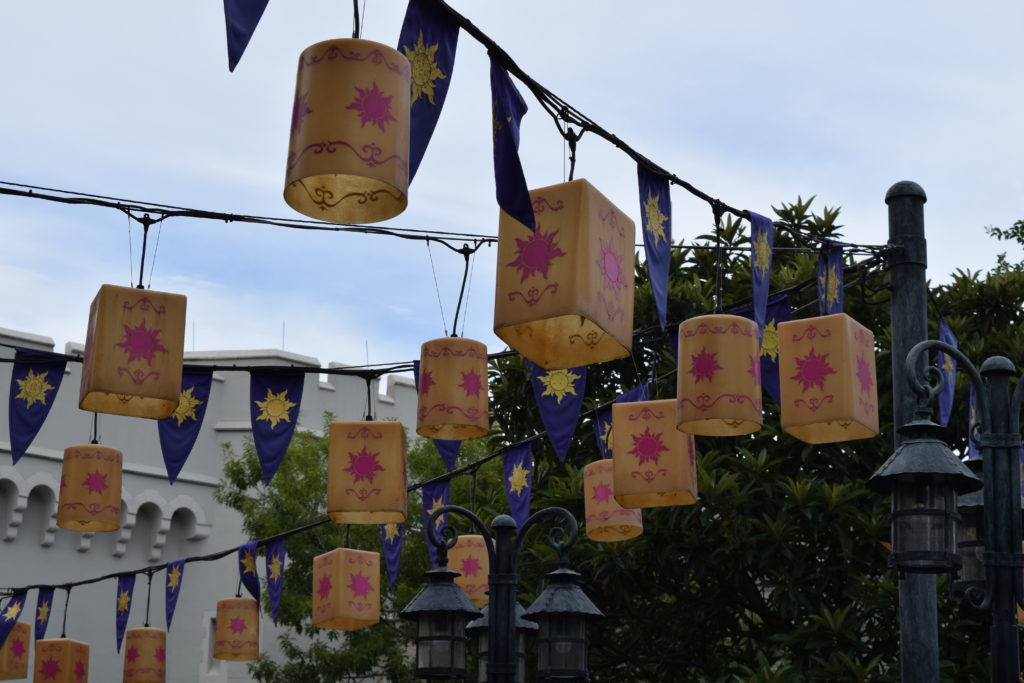
After a thorough internet search, I stumbled across a beautiful pattern that I modified for my own use. As noted on the SparklyEverAfter blog, credit for the original pattern goes to @SpectroPatrick for adding an intricate border to the Tangled golden sun depicted below. Upon visiting the Tangled themed bathrooms at Walt Disney World’s Magic Kingdom, I noticed that the lanterns depicted a pink stencil on a natural-colored paper background. Additionally, I noticed both round and square lanterns so I updated the design to reflect these details. You may download, print, and assemble your own lanterns by saving the full resolution design. Simply right click or control click on the description under each image and select “Save Image” to download. You can also click the link first to see the full image and save it using the same steps.


If you prefer, you may also use the original design for round lanterns in gold or the modified design for square lanterns in gold. With a little effort, you can change the color in GIMP so try it out yourself or let me know if you have a different color in mind!
Selecting the right materials for the Tangled lanterns
I wanted a high quality paper for the lanterns so I experimented with several products before selecting this classic linen paper, baronial ivory in color available from Amazon. The paper is excellent quality with a nice texture, but does contain a Classic Linen watermark. Because of this, I sorted through the sheets of paper one at a time to find pieces with the watermark towards the edge so it would be minimally interfere with the finished lantern.
Optional step: As a detail-oriented engineer, I opted to cut out a small notch in the paper to allow for a clean design. You don’t have to do this but think it’s worth the extra effort! Keep in mind that the ideal look is for the sun to have one ray on top and two rays on the bottom (think of them as feet) since this is how it appears in Disney’s Tangled. The pattern will work in both orientations though!


After you cut the notches, prepare the lantern by bonding one seam on two 8.5×11 sheets of paper with a glue stick. I found that the Elmer’s disappearing purple or gel glue sticks work best and you’ll want at least two for this project. I wish the acid-free glue (pictured) performed better but in my opinion, it lacks the sticky qualities to endure the test of time.

Trim the Con-Tact paper
While the glue dries, trim the Con-Tact Brand Clear Matte paper, also available from Amazon and numerous other sources. You can produce 26 lanterns from one 18″ x 20′ roll and the Con-Tact paper already has measurements on it so it’s easy to work with.

You’ll need 18″ for each lantern so if your contact paper starts between the 13″ and 14″ mark, you’ll just need to unroll it to the next 13.5″ mark and cut there.

Each of those sections will cover two lanterns. Once that section is detached, fold it in half lengthwise and cut along the horizontal so you’ll have two longer pieces that will fit nicely on the back of the lanterns (with a little overlap on the bottom.

Apply Con-Tact paper to the back of the Tangled lantern
Peel a corner from the peel-off backing on the Con-Tact paper and apply it to the back of the lantern as pictured. You want to start a few inches from the edge to allow for your linen paper overlap when you glue the pattern in the round shape. Even square lanterns start as round ones!

Its worth noting that Con-Tact paper can bunch up quickly so I find it easiest to keep the Con-Tact paper as close to the back of the lantern as possible, slowly removing the peel-off backing while keeping the sticky side close to the linen paper lantern, then quickly sticking it to the lantern as I move from left to right. Dont worry, if its not perfect the first time, Con-Tact paper lets you peel back and re-apply without damaging your lantern.
Tip: You may find it easier to keep the bubbles away with a straight edge!
Leave approximately 5 inches of peel-off backing on the right side to allow for overlap on the inside of the Tangled lantern when you glue the second side together.

Glue the other side of the lantern creating a circular design for both round and square lanterns.

Trim excess Con-Tact paper
You’ll notice a little overlap of contact paper along the bottom of the lantern. Depending on how careful you were placing the contact paper, there may be some at the top too. It’s pretty easy to trim the contact paper with scissors. I recommend holding the lantern with your non-dominant hand and using your dominant hand to guide the scissors along the edge of the lantern, slowly trimming away the excess. The scissors will run smoothly along a single layer of Con-Tact paper. You may have to cut when you reach an overlap of two layers. Be careful because you do not want to cut your lantern’s linen paper as you perform this action!
For the round lanterns, I let them dry standing up, slightly reshaping the glued portion to ensure it matches the round shape of the lantern and preventing the glued edges from drying flat.

Folding square Tangled lanterns
For the square lanterns, I fold them in half, letting the bend rest in the center of each lantern page. This will result in the seam appearing at the center as pictured below.

While the glue dries, I cut and shape the 2.0 mm wire for the top of the lantern. Round lanterns require 17 inches and the square wire can be cut a little shorter at 16-7/8 inches due to the bends at each corner. If you’re not sure, you can always cut it a little longer and trim it as you shape it to fit inside the lantern once they are shaped. If the pictured wire is not available, this 2.0 mm wire appears to be a viable substitute for both top and bottom of the lanterns. I prefer using 2.0 mm wire for both and settled on the different sizing in my original design to minimize the cost of my lanterns.

Flexible wire from Amazon
(only two sizes are needed)

Flexible wire from the DIY kit on Etsy
This flexible wire is easy to shape. If you prefer, you could use a wire with increased rigidity such as a wire coat hanger.

The wire is simple to place in the round lantern. The square lantern will require you to work side-by-side with the lantern to form it correctly. I prefer to fold the square lanterns at the seam of the overlapping paper so two sides are approximately 4 1/4 inches and the other sides are 4 inches wide.
To complete the wire shape, I found it easiest to first tape the wire together. Then, follow up with another piece of tape on top of the seam for extra strength.
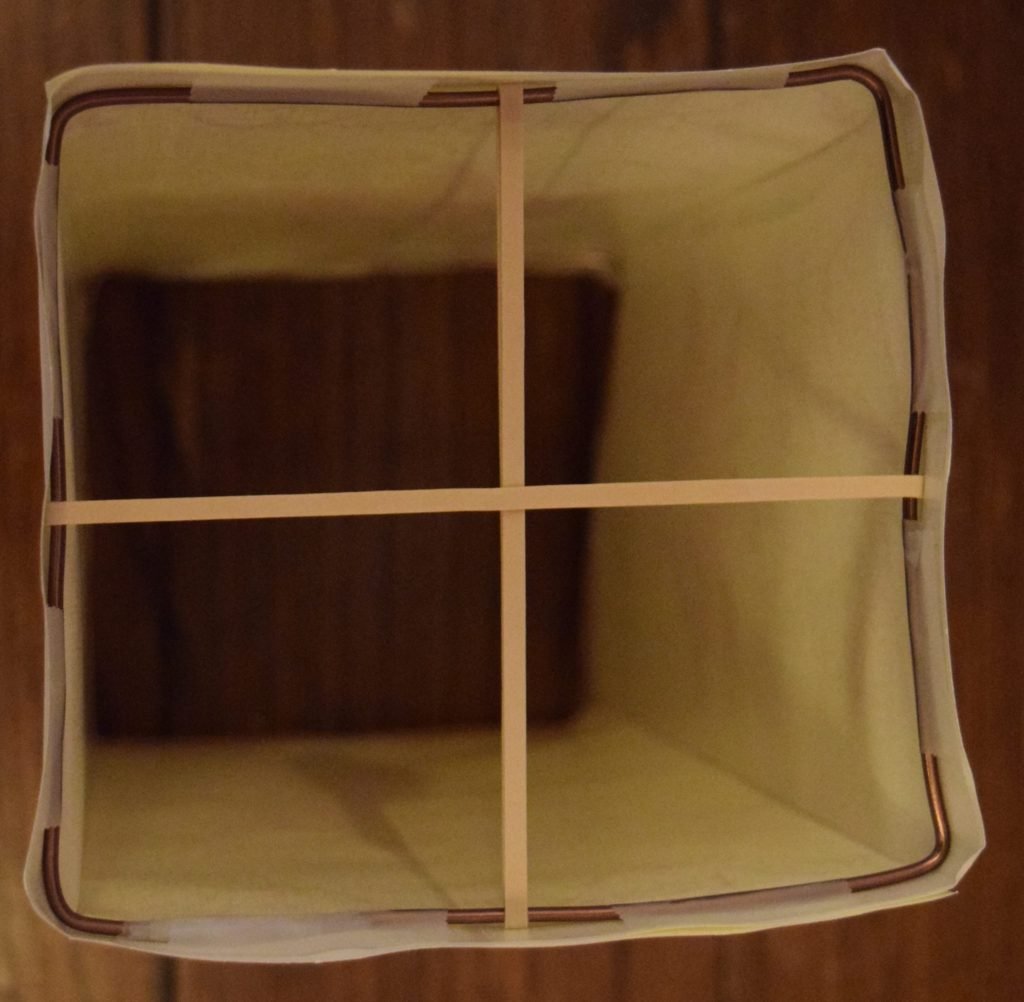
Form wire support rings for the Tangled lanterns
Once you form the top ring, place two pre-stretched rubber bands on the wire that cross evenly across the center. It is important to pre-stretch new rubber bands because brand new ones are too stiff and will bend your flexible wire. Pre-stretching will make the tan color lighten and you’ll notice that the rubber bands have more flexibility.

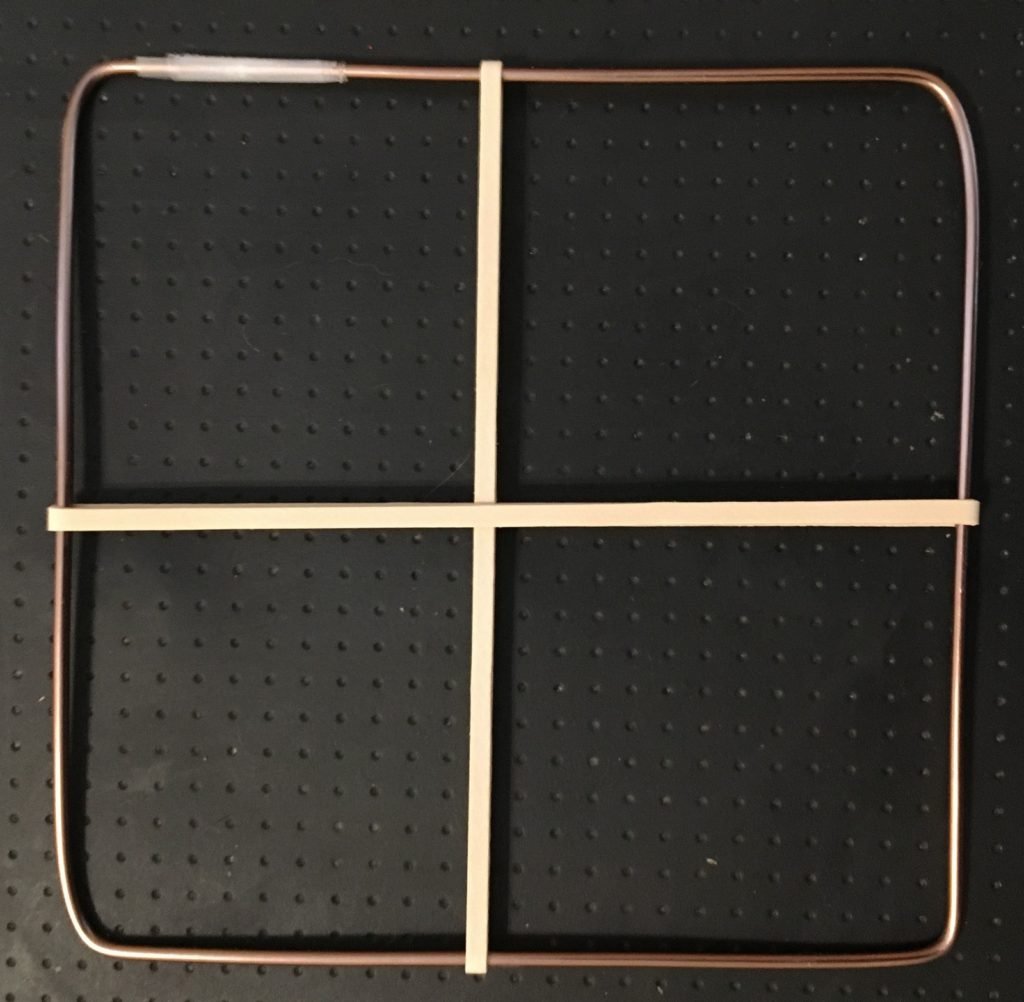
When you place the top wire in the lantern, I find it easiest to apply tape on either side of the rubber band. The end result is that you’ll need eight pieces of tape. I start by holding the wire in between the printed border line and the edge, first taping over the taped wire seam and then taping the opposite side for optimum placement.
As you apply the remaining six pieces, slowly reshape the wire and lantern for the best visual appearance of the lantern.

The bottom wire can be made from the 1.5mm flexible wire from the same kit. (Round and square wire lengths match the top wire lengths above.) I used this wire for two reasons:
- It doesn’t have to be as rigid since you aren’t adding rubber bands.
- There is not enough of the 2.0mm wire in the kit to cover 24 lanterns both top and bottom. Using 1.5mm on the bottom allows you get the most from your wire kit.
Structurally, the bottom wire is not as important for the square lanterns. Though, it helps the round lanterns keep their shape! Form the bottom wire in the same fashion as the top wire and affix to your original Tangled lantern with four evenly-spaced pieces of tape.
Note: The 1.0mm wire included in the kit is not needed for these lanterns. Feel free to save it for another craft project!
Congratulations! You just completed your first Tangled lantern!


Many lanterns later…
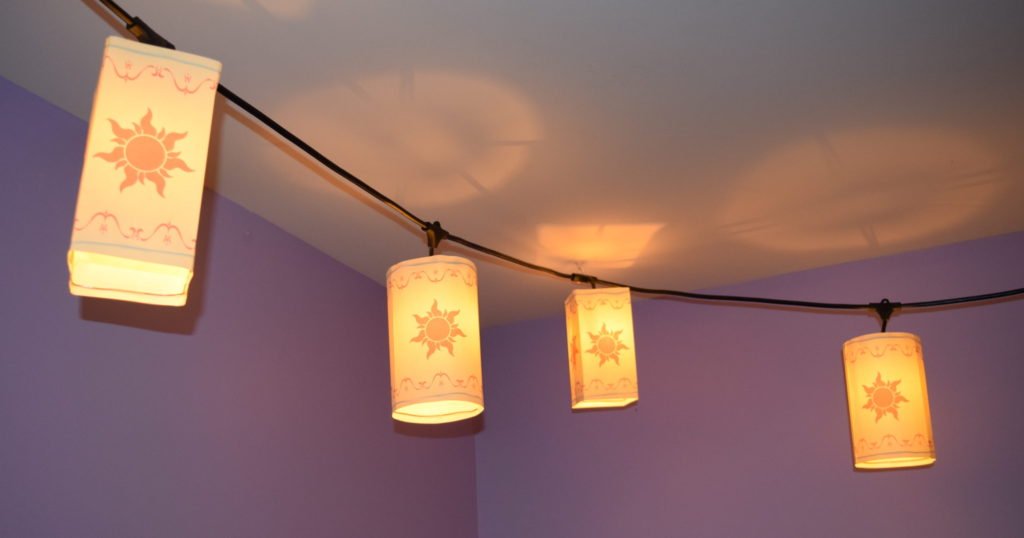
You can hang the lanterns on most outdoor LED patio light kits. The one pictured in my home is from Costco but I’m confident that the rubber band design will allow you to use most kits available on the internet or from your local home improvement store.
Caution & Disclaimer
Caution: Since the lantern is made of linen paper and reinforced with contact paper on the inside, these are designed for indoor use only with LED light bulbs. Do not use this lantern outdoors or with an incandescent light bulb or with candles because it increases the risk of the paper lantern catching on fire.
Disclaimer: The Walt Disney Company maintains the copyright for Tangled, Disney’s Rapunzel, the Tangled golden sun, Walt Disney World, and the Magic Kingdom. I do not own nor claim any copyrights to these items. Rather, this project is inspired by the creativity and innovation of the Walt Disney Company through their depictions in the movie and at the Magic Kingdom. Thank you, Disney, for bringing magic into all of our lives.